Welcome to the Piano World Piano Forums Over 3 million posts about pianos, digital pianos, and all types of keyboard instruments. Over 100,000 members from around the world.
Join the World's Largest Community of Piano Lovers
(it's free)
It's Fun to Play the Piano ... Please Pass It On!
What? You didn't know the engineering part of this before you started? That's even more stunning. So in the end you got an education, too. Not just a piano.
Originally Posted by CyberGene
... when I started this project I didn't know almost anything about electronics (I've studied it in the university but never paid attention), so basically had to learn Ohm's law, had to read how to design a PCB, what rules there are. I learned the hard way what pull-up resistor is and for that reason had to redesign my PCB.
That's what's great about this project, big part of it for fun because I learned a lot: about pianos, about working with wood (I never used a chisel before, glueing wood, cutting it, filing it...), about working with aluminum profiles (I have only assembled IKEA furniture and drilled holes in the wall with a drill to secure the furniture, that's the most "advance" handymen work I've done in my life). Well, as a kid I used to solder some radio kits, so I "could" solder but this didn't help much since SMD soldering turned out to be different Even the programming was new to me, since I'm used to Java where I can do anything and I'm not penalized too much. Here, on the controller I realized that even an if-statement takes precious CPU counts Forget about calculating a logarithmic MIDI velocity value on the fly! I pre-calculate it and store in a huge array, so that I produce corresponding MIDI value directly from the duration in microseconds, rather than doing math stuff. This is definitely the most fun project I've done in my life, the one that combines most varying subjects to learn and at the same time producing a result: a MIDI-controller What is not to like. Only my wife is not happy, since I decided to start this project almost at the same time my daughter was born, so it's kind of a midlife crisis, so to speak, but at least she admitted she prefers seeing me with a soldering iron in the bedroom than drinking with "friends"
There was a time long ago (when manufacturing was still a thing here) that I would have hired you in a second. And you'd have had a lot of fun.
But these days we don't make things anymore. The Chinese make everything.
Originally Posted by CyberGene
Originally Posted by ]What? You didn't know the engineering part of this before you started? That's even more stunning. So in the end you got an education, too. Not just a piano.[quote=CyberGene
... when I started this project I didn't know almost anything about electronics (I've studied it in the university but never paid attention), so basically had to learn Ohm's law, had to read how to design a PCB, what rules there are. I learned the hard way what pull-up resistor is and for that reason had to redesign my PCB.
That's what's great about this project, big part of it for fun because I learned a lot: about pianos, about working with wood (I never used a chisel before, glueing wood, cutting it, filing it...), about working with aluminum profiles (I have only assembled IKEA furniture and drilled holes in the wall with a drill to secure the furniture, that's the most "advance" handymen work I've done in my life). Well, as a kid I used to solder some radio kits, so I "could" solder but this didn't help much since SMD soldering turned out to be different Even the programming was new to me, since I'm used to Java where I can do anything and I'm not penalized too much. Here, on the controller I realized that even an if-statement takes precious CPU counts Forget about calculating a logarithmic MIDI velocity value on the fly! I pre-calculate it and store in a huge array, so that I produce corresponding MIDI value directly from the duration in microseconds, rather than doing math stuff. This is definitely the most fun project I've done in my life, the one that combines most varying subjects to learn and at the same time producing a result: a MIDI-controller What is not to like. Only my wife is not happy, since I decided to start this project almost at the same time my daughter was born, so it's kind of a midlife crisis, so to speak, but at least she admitted she prefers seeing me with a soldering iron in the bedroom than drinking with "friends" [/quote]
Great progress! It's really starting to come together and be "real." Have you considered adding "blinky lights" for the key presses, maybe drive some segmented LED meters? Back when I was doing more home electronics projects, I'd always add blinky lights just because I could and it always made people appreciate the project!
Now learning: Debussy Clar de Lune, Mozart Sonata in C K. 545, Joplin The Chrysanthemum Instruments: Yamaha N1X, Roland GO:PIANO, Piano de Voyage
Great progress! It's really starting to come together and be "real." Have you considered adding "blinky lights" for the key presses, maybe drive some segmented LED meters? Back when I was doing more home electronics projects, I'd always add blinky lights just because I could and it always made people appreciate the project!
Haha, as a matter of fact I programmed the LED on the controller board to blink on each key press but I disabled that for the video, thinking it’s cheesy 🥳
Just wondering if you found the delay to be 1ms or so...? Answering it may solve some problems in this forum apparently.
In the past, I did some tests with a Teensy 3.2 (slower microcontroller) and Hall sensors with little magnets and there was not significant difference between its MIDI over USB output and my Kawai CL35 MIDI output, anyway I was using just five notes, but the Teensy USB MIDI function uses (I don't remember exactly) a few microseconds, so if code is wisely written there should be not appreciable latency. Moreover, I used analog inputs, which are much slower than digital, as CyberGene uses. Who knows, with the new Teensy 4 perhaps you could use directly analog signals.
Actually, the things are a bit complicated when using USB MIDI, which is what I use with the Teensy. The USB topology consists of a host and slave devices. The computer on which the piano VST runs is the host and it's this computer, t.e. the host, that pings the slaves (BTW, I learned some people are offended by that terminology and there are some movements to not use the word "slave" in computer terminology 🤦🏻♂️). It seems that the USB spec (or maybe the USB MIDI in particular) says the host will poll the slave for new messages every 1ms. Which basically means that the MIDI latency over USB is 1ms. On the other hand, according to the specification, some devices support grouping of multiple MIDI events into one single USB data chunk and the Teensy MIDI implementation supports for that. Which means that I can play a chord and create a big USB data chunk that will wrap multiple MIDI events, and then the host can unwrap them at once. I'm not sure how supported that is, but it means that with proper implementation at both device and host level, MIDI over USB might be faster than the limited serial rate of DIN MIDI.
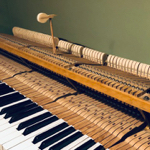
As I said, creating the long IDC34 cable turned out to be tricky. Usually the connector is clamped with a vice but apparently that applies to only the edge connector. I tried also making the intermediate connectors in the middle of the cable and it was close to impossible since the cable goes in the way of the vice jaws screw and needs to be twisted... Well, I gave up and instead created my own improvised tool:
Well, it worked pretty well, so after an hour and a half I had one long cable with 18 connectors:
Looks pretty nice, huh?
BTW, using imgur for image hosting now. Thanks, Mac!
Remaining stuff: - As I said, I screwed up one of the PCB-s and have to create a new one. (I already hate soldering! 😢) - Wire the power across all the boards - Wire the ES7 single pedal (continuous) and test it with the ADC lib, calibrate values (fortunately I created a detailed map of pedal depth to MIDI CC values from the ES7 before selling it) - Finish the fine regulation of half of the white keys and most of the black ones (escapement, aftertouch, hammer drop, backcheck, double-repetition spring) - Test the entire piano with some real music
Possible problems: - I transfer power supply from the controller board sequentially through all 17 modules. There might be too high voltage drop at the end, although calculations show it should be enough. If not enough, will split it and power in groups, possibly from multiple power adapters - Currently I use an iPhone charger since it has 5mV p-p ripple and with that everything works great, however this charger can supply only 1A and I need 2A. Maybe I will split the power and use two iPhone chargers. Or I can test again with the iPad charger which is 2A but has 20mV ripple and that could not be great (although the comparators have hysteresis, so shouldn’t be a big problem but still needs to be checked). - I’ve tested with simple chords and single notes mostly. Mayne the scanning speed will choke with huge and heavy playing across the keyboard, especially with very heavy clusters.
So, here's my latest demo video in this thread after which I will start a dedicated one. I think things are pretty finished right now and thought using this video as the first more serious presentation but since I didn't play anything flashy, let this stay here.
I've spent the entire night with almost no sleep to finalize everything. In the previous days I was on a holiday, then I had some family time, so couldn't work more but finally managed to go through the regulation finalization. I can still improve the back-checks but it's already good now. I also soldered a new note module since as I mentioned I screwed up one of the existing ones. Also I lost half a day debugging a weird problem thinking that two of the PCB-s might be faulty ultimately realizing that I have somehow shorted two of the signal lines of the IDC-cable. Fortunately my design is made to support 88-keys (hence an additional note module), so I could reuse a free signal line and didn't have to make the cable again. The Teensy controller PCB was made many months ago in a hurry, so I may have to redesign it, so that cables and sockets are on the correct side but that's minor.
Calibrating the keyboard is a tedious process that takes more than an hour. The trimpots have 25-turns end to end and so setting the predefined distances take time, as well as a bit of dexterity, since I hold hammers at the rail, or with various spacers, having to observe the LED of my calibration subroutine. Once done, they I had to go through all of them and fine tune. It's like voicing a real piano since I can very precisely set where the distances are measured across the hammer travel, also listening to the result and deciding how loud the note will be. It's both an exhausting process but also a very calming one since I am in complete control of every note and feel like a piano technician I've spent days thinking on how to optimize the code to be ultra-efficient and as a result the scanning is so quick through the entire keyboard that it allows for the velocity measurement to be performed after the escapement and still be very precise. As a result I can also play easily off the jack, unlike my Yamaha N1X (and unlike NV10 AFAIK).
It turned out if I just send the measured velocity, the higher keys will gradually sound unnaturally louder. So, although it called MIDI velocity, it's rather interpreted as hammer momentum, because the lighter hammers of the high notes can be more easily accelerated to higher velocities. To compensate for that audible discrepancies, I had to create "stretching" of the internal velocity map and since it's an optimized code, I had to multiply it for all the groups and it took almost the entire RAM of the controller But it's now SO BALANCED! With a bit more fine-tuning it can kind of match the N1X. The only difference is the 120 year old keyboard and piano action is still rather cr*ppy, despite all my efforts to restore and regulate it, especially compared to the ultra-smooth and brand new Yamaha action. But I'm sure if I have a good keyboard and action, I can easily match N1X in terms of feel and dynamics. I must admit I'm pleasantly surprised how well the entire thing reacts. I didn't expect it to be so good, TBH.
So, the only remaining thing now is the sustain pedal. It's a super easy task but I simply couldn't find more time and energy to do so, I'm totally exhausted Maybe tomorrow. I desperately need to sleep.
And now, the video. Apologies for the lame music and playing but I was already at my limits.
BTW, I will need a dedicated power supply for sure. It works great with the iPad charger but then I changed the USB cable to a longer one and had to recalibrate the entire keyboard because of the changed voltage drop... Since I rely on very precise voltage comparison, any little change immediately has a result. Which means I cannot rely on external power but should use an internal one, so that a change of power cables won't affect calibration It's a small thing but yeah, it's a disadvantage of this particular design.
What a video! The demo and DIY project, are fantastic CyberGene.
Have you thought up ideas to simplify and/or automate the trimpots and their calibration?
Interesting note on the iPad charger and cable. Mains voltage in my house sometimes swings +/-15 volts during the day, so that is a factor for small wall warts. I still like the idea of cheap old lab power supplies for now; just shut them down when not in use as they are not too efficient. Batteries can provide ultra low noise power but they are a pain to recharge, work down in voltage, and are expensive (well junk from dubious suppliers can be cheap), and need periodic replacement.
About the comparators, a better approach would be using a separate reference for the pots. Relying on the power supply voltage is not adviseable for a bunch of reasons. There are some 4.096 ICs that work with 5V in the input. Not sure if your design would support such a change easily but, for a Mark II version of the electronics, you may consider it.
This has been such a fun project to watch, and thanks for keeping us all in the loop to follow your progress. Congratulations on getting it all working, that's a really huge achievement in my opinion!
Originally Posted by CyberGene
BTW, I will need a dedicated power supply for sure. It works great with the iPad charger but then I changed the USB cable to a longer one and had to recalibrate the entire keyboard because of the changed voltage drop... Since I rely on very precise voltage comparison, any little change immediately has a result. Which means I cannot rely on external power but should use an internal one, so that a change of power cables won't affect calibration It's a small thing but yeah, it's a disadvantage of this particular design.
Why not just keep using the iPod power supply with an extension cord so you can keep the same length USB cable? Or am I missing something?
Now learning: Debussy Clar de Lune, Mozart Sonata in C K. 545, Joplin The Chrysanthemum Instruments: Yamaha N1X, Roland GO:PIANO, Piano de Voyage


![[Linked Image]](https://i.imgur.com/lprB4dK.jpg)
![[Linked Image]](https://i.imgur.com/VKa6EWo.jpg)

