Welcome to the Piano World Piano Forums Over 3 million posts about pianos, digital pianos, and all types of keyboard instruments. Over 100,000 members from around the world.
Join the World's Largest Community of Piano Lovers
(it's free)
It's Fun to Play the Piano ... Please Pass It On!
In the very near future, I will be moving forward with a DIY approach to a recondition and regulation of the action from my Yamaha G5 Grand Piano. For those of you who missed my other post regarding prior work done to the action, it can be found here..
For the first post, I will list some resources I have run across and plan to follow (overall) to help me along the way. The action will need new hammers and shanks but I unfortunately cannot afford that at the moment. So, I will be hoping to purchase those items in the next 6 months and revisit the action to work those in.
This is really interesting! I am planning myself to do the same thing and was gonna ask for general advices on this forum (I've been a regular participant on the digital piano sub-forum for many years but never here). I guess this thread will also help me, thank you!
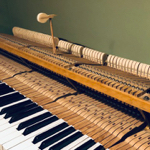
A little bit about my project. I want to make a DIY MIDI controller from a grand piano action by using optical sensors. I managed to find an old (probably ~100 years old) 85-key grand piano action which is in a fairly good condition and here's a proof of concept:
I've been playing an acoustic piano upright since I was a kid and I've owned multiple digital pianos but never a real grand piano. I own a Yamaha AvantGrand N1X though, which is a hybrid digital piano with real grand piano action. So, I'm kind of creating a DIY competition to the Yamaha Kidding aside, I'm more after the adventure of doing something like that myself rather than the actual goal. Which is why I'm also interested in reconditioning and regulating the action myself although I can use a skilled piano technician (who found the action for me). I'm relatively skilled with handcraft, etc and for the last year I've been studying in great details how the grand piano works. So, I also started with the Reblitz book. I think I need to replace the white key covers and have already purchased a set of new white plastic covers. Also, many keys (or rather the action parts of those keys) seem to be having something like a friction or rubbing against neighbors. So, I was gonna ask about general advices on how to approach that task and what tools I will need. I hope I can learn that from this thread here, so thanks again.
I'll use this post as the first one to illustrate the process I'm working through. Since I am not a tech, I will only post the items that I run into that I feel should need attention or where I seek guidance. Feel free to provide any advice or feedback that you feel could be beneficial to this endeavor.
The action out of the piano and ready for tear down
From what I can tell, the shanks and knuckles have served their life. As I am unable to purchased new shanks/knuckles at this time, I will rework these in an attempt to gain a bit more life
A little before and after comparison. This was the first knuckle I attempted to rework.
Since the first knuckle came out ok, I went ahead and did all 88. The ones in the middle section of the keyboard are definitely worn more. Overall, I hope it makes a nice improvement.
After the knuckles were done (which took around 3-4 hours), I removed the stack and popped a few keys off. The balance rail key pins are coroded and very sticky.
I measured the balance rail key pins and the front rail key pins. Once the sizing was verifed, I ordered VS ProFelt and a box of 0.125 and 0.137 cauls to fit as soon as I apply the VS Profelt.
How did you recondition the knuckles? On some of mine it seems the white core is broken/degrading. I’m wondering what the material of that core is and whether anything can be done or the entire knuckle needs to be replaced.
How did you recondition the knuckles? On some of mine it seems the white core is broken/degrading. I’m wondering what the material of that core is and whether anything can be done or the entire knuckle needs to be replaced.
Slowly worked the groves out using 500 grit sand paper. While taking extra care to maintain the round shape that the knuckle is supposed to have. Before the action goes back in, I will lightly agitate the leather and apply some PTFE powder. Once this is done, I will post pictures.
I'm not sure what is on the inside of the core. Someone more knowledgeable about the physical aspects of the knuckles can probably answer that question.
I tune and regulate my grand piano myself twice a year since quite a long time. Sorry but IMHO the price you paid for what you got recently was outrageous. Piano tuning and regulation is not rocket science, as you might be discovering while working on it. If you have good patience, meticulous attention to detail and if you're good at evaluate/criticize your work, you can fix as many things as you feel comfortable to do. Once you will have fixed the obvious problems (seen on your pics), I recommend you do a complete regulation, starting with bedding/positioning the keyframe, etc.
I tune and regulate my grand piano myself twice a year since quite a long time. Sorry but IMHO the price you paid for what you got recently was outrageous. Piano tuning and regulation is not rocket science, as you might be discovering while working on it. If you have good patience, meticulous attention to detail and if you're good at evaluate/criticize your work, you can fix as many things as you feel comfortable to do. Once you will have fixed the obvious problems (seen on your pics), I recommend you do a complete regulation, starting with bedding/positioning the keyframe, etc.
This is basically what I'm looking to do. Help identify what to do and how it's best to do each step. I plan to address all of the wear items (within reasonable budget) and get some help to go through a complete regulation to exactly match the Yamaha spec sheet they provided me.
Originally Posted by Andymania
Originally Posted by TurboMatt
Slowly worked the groves out using 500 grit sand paper. While taking extra care to maintain the round shape that the knuckle is supposed to have.
??? They look thicker than the old ones...
I agree...isn't that odd? The leather seems to have 'puffed' up some. I'm not sure if that's from the agitation effect from the sand paper? I plan to lightly brush them with a plastic bristle brush then apple some PTFE powder before the action goes back into the piano. Even as they are now, they are very smooth to the touch. Much better than how they were before the sand paper!
Adding these pictures just to continue through the process. Please provide feedback on anything you can identify that is in need of some attention.
I have ordered some polishing materials to address the balance rail and front rail key pins. I should be able to get to that in the next few days. Pictures will be added once that step is started.
Picture to illustrate the current whippen setup
Picture to illustrate the current letoff button and jack
Keyframe after vacuuming
Keyframe again
Balance rail after vacuuming
Front rail after vacuuming
Random cool pic of the front rail
Keys stored on an adjacent table.
Back rail cloth which appears to be in great shape
Back rail cloth #2 which appears to be in great shape. Thoughts?
Looking good! Maybe you could show us a side view of one knuckle resting on the jack like normal so we can see the alignment there.
Sure thing. Does it matter which knuckle/jack?
As a note, I will probably have a few more posts before I can get to that. I would like to have the key frame completely cleaned up and all of the pins polished before I put the keys in.
As well, I'm going to check the key frame in the key bed of the piano this evening and make sure it sits perfectly flat.
If you are going to bed the key frame be certain to have the action completely assembled. Also, take the time to clean and polish the glides and be certain the wood they contact on the key bed is clean and smooth. Goes without saying the keybed needs to be very clean. Just a thought: looking at your front and balance rail pins I’m a bit uncertain what caused the deposit/corrosion or whatever it is. It makes me suspicious that other action components may be contaminated thinking in this case about the glide bolt threads. If your bedding the key frame they should turn smooth.
If you are going to bed the key frame be certain to have the action completely assembled. Also, take the time to clean and polish the glides and be certain the wood they contact on the key bed is clean and smooth. Goes without saying the keybed needs to be very clean. Just a thought: looking at your front and balance rail pins I’m a bit uncertain what caused the deposit/corrosion or whatever it is. It makes me suspicious that other action components may be contaminated thinking in this case about the glide bolt threads. If your bedding the key frame they should turn smooth.
I just installed the key frame in the piano and checked it out. It was pretty far out from level. However, this is just the key frame. I can skip this step for now if that's the best procedure. A few videos I ran across stated that it's the first step?
The glide bolts turn very smooth actually. There is some mild corrosion on their surface but the threads look fine and turn smooth.
I took a couple of quick videos. I assume that I should revisit the bedding process after the action is complete and back together?
Initial check of the key bed
After initial adjustment
Key bed / key frame are flat. I should probably revisit this after the action is completed?
I was just thinking that working on the knuckles will likely affect the jack alignment with the knuckle. A photo of any jack will do, as long as you check every one once everything is back together.
However, this is just the key frame. I can skip this step for now if that's the best procedure.
The foundations of a house determines if it will be solid or not. For a complete regulation, this first step is actually vital as you will build everything else on it. I would actually wait to start your complete regulation only once you will have done other important work, such as cleaning up those rusty pins, etc.
Unless you have a particular action with special limits, after finding the optimal keybed position for sound (especially the treble end side - do this as many times as needed to be sure), install cheek blocks correctly to achieve this. Then you can start with empty frame and no bedding screws touching (beware of blind glide bolts on certain Yamaha models), then adjust screws starting with the back rail, etc. Once no knock, fine adjust with the usual slipping paper sheet trick. Then install most keys on frame except a few so you can still work to adjust bolts and with enough room for paper test, and verify/adjust everything. The key frame on keybed initial step should be done with optimal RH in the room as much as possible. Autumn time like right now should be OK. If done in dry or humid condition in the piano room, use a humidifier or dehumidifier to compensate, etc. Hopefully the procedure you have mentions most of this and more.
However, this is just the key frame. I can skip this step for now if that's the best procedure.
Then you can start with empty frame and no bedding screws touching (beware of blind glide bolts on certain Yamaha models), then adjust screws starting with the back rail, etc. Once no knock, fine adjust with the usual slipping paper sheet trick. Then install most keys on frame except a few so you can still work to adjust bolts and with enough room for paper test, and verify/adjust everything. The key frame on keybed initial step should be done with optimal RH in the room as much as possible. Autumn time like right now should be OK. If done in dry or humid condition in the piano room, use a humidifier or dehumidifier to compensate, etc. Hopefully the procedure you have mentions most of this and more.
It is important to include one more step in this procedure. After the keyframe is bedded to the key-bed, (and there are different approaches needed for differing stiffness found in various makers' frames), place the stack on the keyframe, without the keys, and install it in position. Check each mating of the cleats to the feet of the stack and shim so that all feet of the stack are equally seated on the key-frame. This is important because if you have a foot that is not touching, when you screw it down, a stress will have been created between the two assemblies and they key-frame can become weather sensitive, ie, it can knock in either dry or damp conditions, depending on its original installation .
I was just thinking that working on the knuckles will likely affect the jack alignment with the knuckle. A photo of any jack will do, as long as you check every one once everything is back together.
You are absolutely correct. I was pondering that exact thought as I was working them. The hammer and shank will sit closer to the jack now so that will need to be addressed.
Originally Posted by Bosendorff
Originally Posted by TurboMatt
However, this is just the key frame. I can skip this step for now if that's the best procedure.
The foundations of a house determines if it will be solid or not. For a complete regulation, this first step is actually vital as you will build everything else on it. I would actually wait to start your complete regulation only once you will have done other important work, such as cleaning up those rusty pins, etc.
Unless you have a particular action with special limits, after finding the optimal keybed position for sound (especially the treble end side - do this as many times as needed to be sure), install cheek blocks correctly to achieve this. Then you can start with empty frame and no bedding screws touching (beware of blind glide bolts on certain Yamaha models), then adjust screws starting with the back rail, etc. Once no knock, fine adjust with the usual slipping paper sheet trick. Then install most keys on frame except a few so you can still work to adjust bolts and with enough room for paper test, and verify/adjust everything. The key frame on keybed initial step should be done with optimal RH in the room as much as possible. Autumn time like right now should be OK. If done in dry or humid condition in the piano room, use a humidifier or dehumidifier to compensate, etc. Hopefully the procedure you have mentions most of this and more.
What do you mean by blind glide bolts? I did not measure nor monitor RH when I started this yesterday. Will it be sufficient to open windows for some time while monitoring RH outside? I have no way to monitor RH with a device inside my home. Should that be important, I will purchased a device to measure.
Originally Posted by Ed Foote
Originally Posted by Bosendorff
Originally Posted by TurboMatt
However, this is just the key frame. I can skip this step for now if that's the best procedure.
Then you can start with empty frame and no bedding screws touching (beware of blind glide bolts on certain Yamaha models), then adjust screws starting with the back rail, etc. Once no knock, fine adjust with the usual slipping paper sheet trick. Then install most keys on frame except a few so you can still work to adjust bolts and with enough room for paper test, and verify/adjust everything. The key frame on keybed initial step should be done with optimal RH in the room as much as possible. Autumn time like right now should be OK. If done in dry or humid condition in the piano room, use a humidifier or dehumidifier to compensate, etc. Hopefully the procedure you have mentions most of this and more.
It is important to include one more step in this procedure. After the keyframe is bedded to the key-bed, (and there are different approaches needed for differing stiffness found in various makers' frames), place the stack on the keyframe, without the keys, and install it in position. Check each mating of the cleats to the feet of the stack and shim so that all feet of the stack are equally seated on the key-frame. This is important because if you have a foot that is not touching, when you screw it down, a stress will have been created between the two assemblies and they key-frame can become weather sensitive, ie, it can knock in either dry or damp conditions, depending on its original installation .
regards,
This makes perfect sense. Funny enough, I was thinking that the stack would absolutely tweak the key frame if everything wasn't perfect. As I'm working through this, I go back in my mind to all of the experience I have building engines (I'm an auto enthusiast). Thinking how precise valve adjustments have to be and comparing that to some of the regulation steps. Thinking about torqueing cylinder heads, main caps etc and comparing that to the key bed / frame relationship. Different worlds but similar approaches to proper technique and detailed steps.
SOP for keyframe bedding is to first look at the design. If the BR studs are accessible above the keys then then it was designed to be bedded with the keys and action in place (in most cases). Also, the FR will normally have a gap at each end near the keyblocks so as to be pulled down flat by the keyblocks. This gap can be exacerbated by improper BR bedding.
BR first, all studs turned up so there is knocking (action and keys on place keyblocks tight), turn number 2 stud (from the left) to just eliminate knocking, then number 3, 4, going back and checking earlier ones to make sure and readjust, then do the end studs by turning stud and tapping on the next stud in until knocking begins, then back it off till knocking ceases. Rinse and repeat. Then rinse and repeat again with both feet on the pedals with fairly hard pressure (testing to see if keybed flexes). Then start looking atbthe front rail. Should be ok though on that piano.
Others may add more details, but that is the basic idea.
Pwg
Would it be helpful if I took a picture of the key frame from the bottom? As I want to make sure I do this correctly, I am open to the best advice to follow.
Thankfully, the key frame adjustment screws can be accessed with the action fully assembled. So, I can take care of the key bedding afterwards if that's the best way.


![[Linked Image]](https://i.ibb.co/M5T2Fv0/IMG-7169.jpg)
![[Linked Image]](https://i.ibb.co/R3gjGw6/IMG-7168.jpg)
![[Linked Image]](https://i.ibb.co/QNR9Vrn/IMG-7178.jpg)
![[Linked Image]](https://i.ibb.co/4R11Zbt/IMG-7179.jpg)
![[Linked Image]](https://i.ibb.co/THrBJ81/IMG-7187.jpg)
![[Linked Image]](https://i.ibb.co/QNcVKgF/IMG-7186.jpg)
![[Linked Image]](https://i.ibb.co/Xt8CCqq/IMG-7204.jpg)
![[Linked Image]](https://i.ibb.co/tXmj2ts/IMG-7205.jpg)
![[Linked Image]](https://i.ibb.co/2cxcVxr/IMG-7205crop.jpg)
![[Linked Image]](https://i.ibb.co/fFRDH3R/IMG-7212.jpg)
![[Linked Image]](https://i.ibb.co/wcnfPbs/IMG-7213.jpg)
![[Linked Image]](https://i.ibb.co/BCgNRr7/IMG-7220.jpg)
![[Linked Image]](https://i.ibb.co/QPLMKvM/IMG-7221.jpg)
![[Linked Image]](https://i.ibb.co/JcCdPJt/IMG-7226.jpg)
![[Linked Image]](https://i.ibb.co/RgGQ3hq/IMG-7228.jpg)
![[Linked Image]](https://i.ibb.co/WWN7NsN/IMG-7229.jpg)
![[Linked Image]](https://i.ibb.co/WKKSjpy/IMG-7231.jpg)
![[Linked Image]](https://i.ibb.co/LJFdLSm/IMG-7232.jpg)
![[Linked Image]](https://i.ibb.co/jHhjj6y/IMG-7234.jpg)
![[Linked Image]](https://i.ibb.co/Wc4yhxr/IMG-7239.jpg)
![[Linked Image]](https://i.ibb.co/ct0khKQ/IMG-7240.jpg)
![[Linked Image]](https://i.ibb.co/k9nXv9J/IMG-7242.jpg)